During this unprecedented time, stay-at-home orders and social distancing have increased the demand for more healthy and self-reliant measures in our homes. These include reducing trips to the store or for takeout food (and waiting in long lines!) in favor of making home-cooked meals and growing gardens.
We’re also spending as much time as possible out in nature, since that’s one non-tech form of entertainment we have left to enjoy. People are reconnecting with the outdoors, whether by growing a backyard garden, tending window boxes or spending time in shared green spaces like state parks or community gardens. As we use this time to re-establish our connection to the Earth, there is still a nagging question: How can we be more self-sustaining with limited open businesses while under a stay-at-home advisory? How can we nurture the plot of earth that we live on, and that sustains us?
Creating your own compost from your food scraps is not only a good way to save money and increase self-reliance, but it also is sustainable and Earth-friendly. Composting removes food waste from the landfill waste stream, returns nutrients to the soil and helps remove greenhouse gases from our atmosphere.
While there are several residential composting programs that pick up food waste (animal by-products included) from your doorstep, you might be wary about a company coming to your house weekly or bi-weekly because of COVID-19 or you simply don’t want to pay a monthly fee. There is always the option to create your own compost pile at home, even if you are short on space.
Raised metal compost tumblers are the best method to effortlessly compost at home (if you have space and the budget) because they also speed up the decomposition timeline. Note: I live in an urban area and have had pests chew through my plastic compost tumbler within two weeks from set up (although I did break the cardinal rule against adding meat). I have an aunt who lives in the same city and she has had a metal compost tumbler for over 10 years with no issues. **If you are not using a residential composting program that goes to an industrial composting site, I do not recommend putting animal by-products in your at-home compost, even a metal tumbler, unless you want to host pests.**
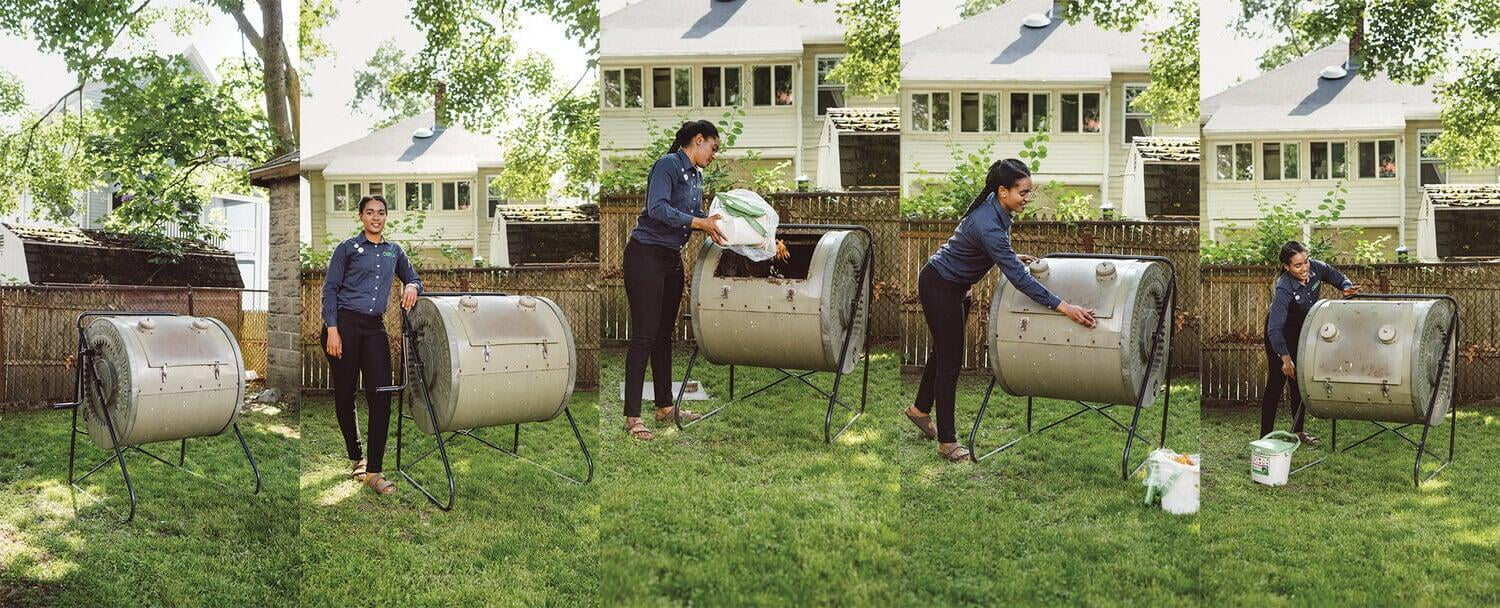
6 STEPS TO COMPOSTING IN A RAISED COMPOST TUMBLER
- You can purchase a compost tumbler online or at your local garden or big-box store. There is also a handy video of how you can build your compost tumbler for free. Once you have it, place the compost tumbler in a sunny location so that it heats up during the day to speed up the decomposition process. Be sure that when you begin to add material to your compost tumbler, you’ve placed it in its permanent location. It is hard to move once it is full!
- To begin, place a scoop of healthy soil, compost or compost accelerator/activator into your tumbler.
- Place 15–30% of carbon-based material (leaves, brown paper bags, yard waste) into the tumbler and 70–85% of nitrogen-based material (coffee grounds, eggshells, food waste; exclude animal and animal by-product waste).
- Fill until only 75% of the way full.
- Spin compost tumbler every five to seven days to increase airflow.
- After four to eight weeks, you should have a finished compost product ready to use in your garden.
SHORT ON SPACE? TRY VERMICOMPOSTING: COMPOSTING IN A BUCKET WITH WORMS.
- Get a 20-gallon non-transparent plastic rectangular bin with a lid. These are sold at your local hardware store or a big-box store.
- Drill evenly-spaced holes with a regular drill bit in the bottom and sides of the bin, usually about 1 hole per gallon works well, so 20 holes for a 20-gallon bin. Be careful to not put too many holes (which will expose the worms and food waste to too much air) or too few holes (which will suffocate the worms and not allow for aeration of the pile)
- Find a strategic place to host your compost pile in a shady area that will not get too much water or sun. Be aware that in an apartment building placing the bin on a balcony may violate fire codes, so find a good location so you will not have to move it once it’s established
- Shred non-glossy paper (like used brown paper shopping bags, cardboard egg cartons or newspaper) as bedding for your worms. Lightly dampen this bedding and maintain its dampness
- Add a small scoop of healthy soil and a scoop of food scraps and let sit for two weeks so microbes that the worms use as food can populate their new home. Lightly water occasionally.
- The best worms for your compost bin are red worms, Eisenia fetida. You can find them at your local garden store or bait shop or you can order them online. They should procreate in their new home, so no need to repopulate. These worms are best because they are epigeic, meaning they remain on the top layer of the soil and use the materials there for their food. If you use earthworms, which are anecic (deep burrowing), they will die.
- Add food to your bin! Focus mostly on adding vegetables, fruit, tea bags, coffee grounds, eggshells. Limit citrus, starches (bread, rice, etc.), spicy peppers, onions, oily food and sugary food. Do not add fats, meat, animal by-products, animal food, animal waste or human waste. When you add food, add a little bit of the aforementioned shredded paper and spray with water if needed. Observe how long it takes for a little food to decompose so you can be sure to not add too much water or food. You don’t want to drown or overwhelm your newly created ecosystem.
- Harvest your compost! In about eight weeks you will be able to use the compost for your garden. To harvest, get another container and a plastic bag with holes cut in it. Stretch the plastic bag over the new container and dump the original container onto the plastic bag and new container. The worms should try to go through the plastic bag holes to remain in darkness, leaving you to sort through your new compost. Replace the worms in the original bin and start the process over again.
- Warning: If you overfeed your bin or if you feed it foods you are not supposed to, then you will notice a proliferation of bugs and bad smells. If you develop fruit flies, place a glass of water with white vinegar and dish soap or fruit fly strips close to your bin.
- Enjoy your flourishing garden with family and friends!